Aug
2012

Olloclip Lens for iPhone

I have had the Olloclip iPhone Lens for quite sometime now and I never ceased to be amazed at the quality of the photos that this little lens can produce with the iPhone 4S. Priced at a reasonable £59.99 this lens kit comprises of the following :

  • Macro Lens which applies roughly a 10X multiplier and allows you to focus the iPhone within 12-15mm of the subject
  • Wide Angle Lens with cover which gives you approximately double the field of view of the normal iPhone.
  • Fisheye Lens with cover which gives you 180 Degree field-of-view
  • A nice little bag to store them in

20120802-110324.jpg

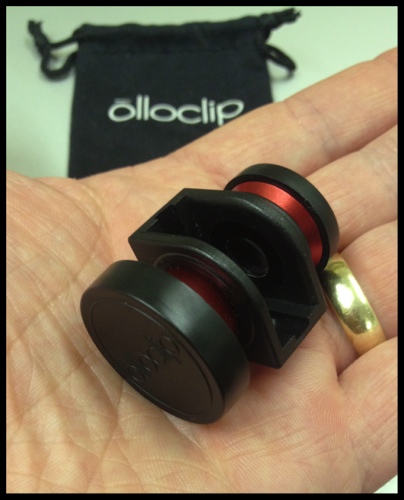
To use the fisheye lens you simply slide it over your iPhone with the larger lens covering your camera, to use the wide-angle simply switch it around. However, to use the Macro lens you need to unscrew the wide-angle lens from the Olloclip. This is where the bag comes in handy, once you have unscrewed the wide angle lens simply pop it in the bag and store it securely whilst you take your photos.

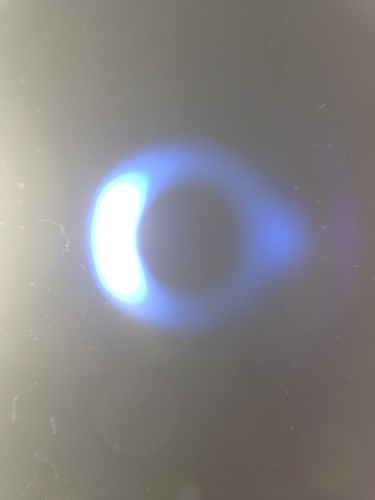
A couple of things to note is that due to the design of the lens it cannot be used with any case which to be quite frank that’s understandable. It fits snugly onto your iPhone 4/4S so that it won’t drop off and secondly it cannot be used with the flash on, well it can but you get reflections of itself, see below 😉

I recently read that you can remove the Fish Eye lens from the Olloclip by twisting it as if you were unscrewing it. However, I didn’t dare try it and well, to be honest although I rarely use the Fish Eye lens I would rather it remain attached lol.

All in all this is a cracking little lens and I would highly recommend it.

Check out some of the images I have taken with the Olloclip Lens for iPhone below, take a look at the Flickr Group and feel free to comment with links to your photo gallery either on Flickr or elsewhere.
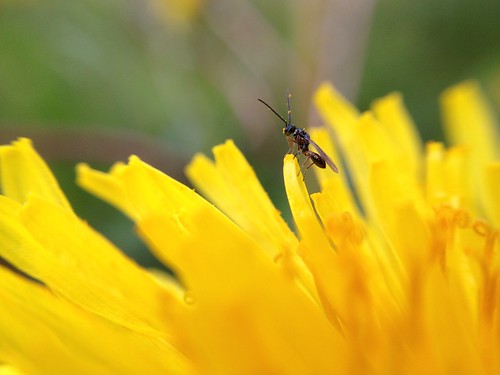
Keeping Look Out
A fly on a dandelion, no edits using iPhone 4s and the Macro lens.
Keeping look out

Rocks of coffee
Instant Coffee granules on a spoon. iPhone 4S with Macro lens
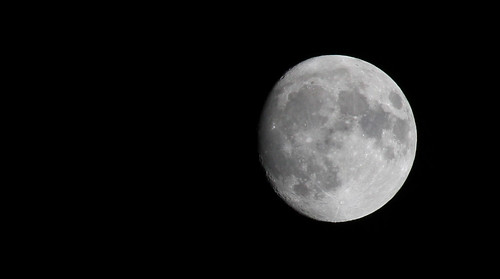
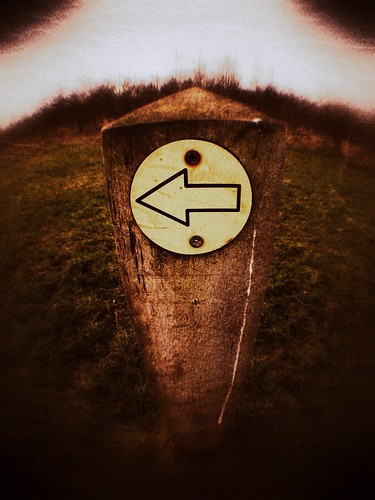
Rocks of Coffee

Are you lost
iPhone 4S with Fisheye lens attached
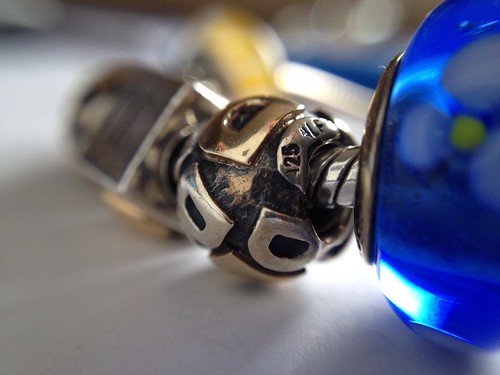
Are you lost?

Another Charm
iPhone 4S with macro lens attached
Another Charm

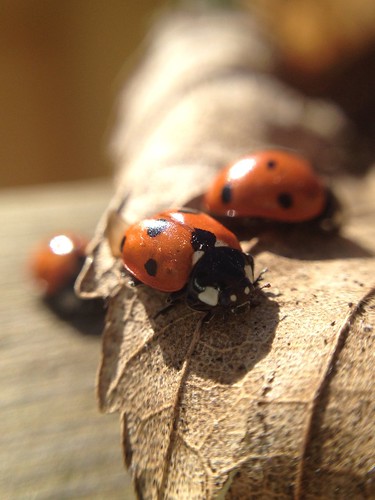
Meeting of ladybirds
Again another iPhone 4S with macro lens shot
Meeting of LadyBirds

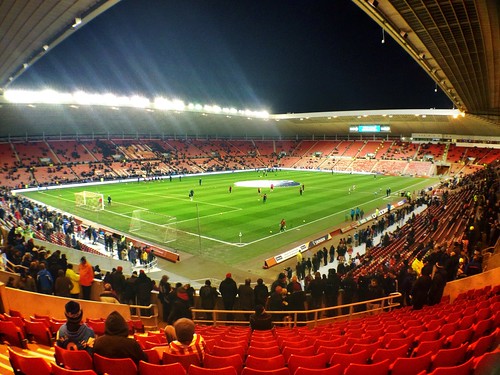
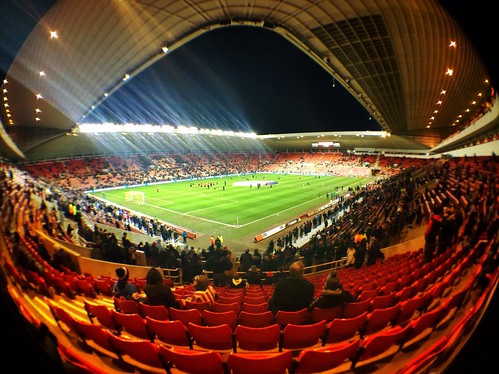
Pretty impressive eh! To see the difference between with and without the wide angle lens I took two photos in the same spot, as you can see the wide angle lens provides quite a significant jump in the visible area, with obvious distortions though.

Stadium of light WITHOUT lens
Stadium of Light

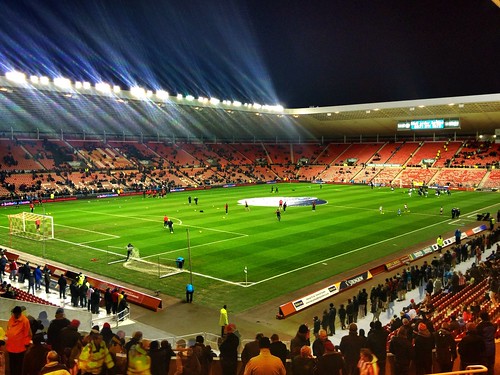
Stadium of light WITH wide angle lens
Stadium of Light Wide Angle

Stadium of light with fish eye lens
Fish Eye

Example of macro with flash on

20120802-102629.jpg

Example of wide angle with flash on, guess I need to clean the lens eh!

20120802-102853.jpg


Aug
2011

My experience with Three

Back in September of last year I posted an entry asking if 3 was better than 2. After testing with a MiFi since then I decided that Three probably was better than O2 so took the plunge and moved my iPhone number to them.

Rather than put myself into a long term contract I selected the £15 per month Sim Only option which more than covers my needs.

  • 300 any network minutes
  • 3000 texts
  • 1GB internet
  • 1 month rolling contract

I have to say that out and about the service was great, internet tethering was fantastic and download speeds were pretty much not far off my broadband speed 😮 I was very happy indeed.

However, the signal I got at home (where I spend a lot of time) was far from ideal. One bar was pretty much all I was provided with and the phone frequently went from 1 bar to No Service. A tweet about it resulted in a tweet from Three who tried to help me out, ultimately I needed to call customer services in order to discuss the issue.

Customer services immediately put me through to the “iPhone team” who advised me restore the phone  to factory defaults – well I did that but it made no difference at all. The customer service team then advised me to test the connection in several other locations and that if that still failed then I would have to take it to Apple as it would be a handset fault!.

Again, out and about it was great but indoors it was diabolical. Now to be fair to Three, the locations I tested O2 don’t always have a 3G connection but if they don’t it will go to an Edge or GPRS signal so at least I won’t lose signal and be unable to make calls. This is where Three fails to hit the mark for me.

The last straw for me was when my wife tried to call me when I was visiting relatives. My daughter was badly hurt but even though I had one bar it failed to connect the call and she had to call me via my brothers mobile.

After checking out alternatives I decided to go with Giff Gaff (Referral Link). As it runs on the O2 network, I know it’s coverage so can be assured that, apart from when being at the Stadium of Light, I will get a signal when I need to. I am only a couple of weeks using Giff Gaff but so far it’s been great  and it’s also incredibly priced £10 per month gives me 250 minutes, unlimited texts and unlimited internet usage! (though does need to be set up for Internet and MMS usage – more on that on my next post).

Although I have lost tethering I still have a Three MiFi which I will use from time to time when I don’t have a 3G connection on Giff Gaff or when I need to connect my laptop to the internet when out and about.

Thinking about joining Giff Gaff? Click this referral link, you will get a free sim with free £5 credit and I will get some referral points 😉

Get a free Giffgaff Sim

Aug
2011

Connecting Sky HD box to Wifi

Since I moved to Sky for my phone and broadband we were offered the ability to have Sky Anytime+ I duly signed up but was told the Wireless adaptor would cost around £60 and as the broadband router is nowhere near my Sky box I needed to find an alternative and hopefully cheaper solution that does not involve running CAT5 cable through two rooms.

Doing a search on Google and eBay I found that there were several USB powered wifi bridges I could use, a quick test of my Sky HD box shows that the USB port is inactive and provides no power. Back to Google I went and found that quite a few people were using a TP-Link Wireless Access Point.

So I opted for the TP-Link TL-WA701ND 150Mbps Wireless Lite N Access Point which was only £17.99 from Amazon.


TP-Link WA701ND Wireless Access Point

In order to set up the TP Link you need a computer. I connected the device to my MacBook Pro via the supplied ethernet cable and configured my Ethernet Network settings as follows :

Manually
IP : 192.168.1.100
Subnet : 255.255.255.0
Router : 192.168.1.254

Fired up Safari and connected to 192.168.1.254, entered the admin username and password (which is admin by default). As Sky configure their broadband routers to be on the 192.168.0.1 – 192.168.0.255 range you need to change the IP address of the TP-Link Box.

To do this you need to click on the Network link on the left hand side and change the values on that page. I configured mine as follows and clicked save.

Network

Type : Static IP
IP : 192.168.0.254
Subnet : 255.255.255.0
Gateway : 192.168.0.1 (This is my Sky router IP address)

Once the device rebooted I logged back in to the admin pages (the device should automatically refresh to 192.168.0.254) and continued to set the wireless part of it up.

Wireless

I elected to set it up in Client mode with the following settings :

Enable WDS : unchecked
SSID : My wireless network name
Region : United Kingdom
Channel Width : 20/40Mhz
Enable Wireless Radio : checked

I then clicked Survey, clicked connect on my wireless network from the list of wifi networks that it had found.
This then put the MAC address of the Sky broadband router in the MAC of AP box and finally I clicked save. At this point I was offered to reboot, you can at this point but there is no need as you will have to reboot it later.

Wireless Security

Selected WPA-PSK/WPA2-PSK
PSK Password : entered my wireless network password, everything else was left as is and I clicked save. Again I was offered to reboot, do not reboot yet.

DHCP Settings

In the DHCP setting page I set it up as follows and clicked save. At this point I rebooted the device.
DHCP Server : Enable
Start IP 192.168.0.100
End IP 192.168.0.101
Default Gateway : 192.168.0.1
Primary DNS : 192.168.0.1

Once the TP-Link device had rebooted I then plugged the Ethernet cable in to the Sky HD box

On the Sky HD Box

From the TV Guide I selected Settings -> Network -> Select
The Sky box then performed a Network search and came back with the following
Local Connection : OK
Service Connection : OK
IP Address : 192.168.0.100
DHCP : ON

That’s it,  Sky Anytime+ is now working great.

Apr
2011

Airport Express Woes

I have two Apple Airport Express devices. One in the loft with a USB printer and a set of speakers then another one in the living room with a set of speakers connected to it. However, the printer was randomly vanishing from the network and the speakers would cut out from time to time.

So I reset both devices and swapped them around. I noticed that the printer would remain on the network on one of the AE’s but vanish on the other. So I put the working one in the loft and just disconnected the second one assuming it was just faulty. Well today I tried resetting the suspect one and it appeared fine but iTunes would not connect to it yet my iPhone would for about 30 seconds before it decided to vanish. Both AE devices are running 6.3 which is the latest version.

Doing some research it was suggested to try downgrading the firmware then upgrading it again so that’s what I tried but it made no difference. After scouring Apple  discussions one person reported similar problems until they changed their Wireless channel to 12. I have mine on 6 as there are no other wireless networks in my range with that number.

I logged into my Sky router and changed the channel from 6 to 12 and also changed it so that it was set to 802.11g only and lo and behold it works!!

So if you have an Airport Express with the following issues :

Airport Express sound cutting out
Airport Express vanishing from network

Then try the above changes on your wireless router. You never know it may work for you 😀

Mar
2011

Photographing the moon

This weekend the moon is apparently going to be the closest to the Earth for a long time. So, I decided to try photographing it for my mostly365.com participation, this is day 26.

Using my Canon 1000d equipped with a Canon EF-S 55-250mm f/4-5.6 IS I took a few shots. First one was just a white circle in the sky, so I adjusted the settings on camera and I ended up with this.

I cropped it and edited the curves a little using Pixelmator. All in all I am pretty pleased with how it turned out 🙂

The Sun...no wait that's not right